

My Ford Transit buddy, Yellow Wolf, sent me a link to some really nice insulated window covers, custom-made for our vans. They’re a perfect fit for the windows and have built-in magnets to stick to the metal surrounding them. They’re also $220 for the side window cover and another $220 for the two back window covers! I didn’t feel like spending $440 for three window covers, so I decided to see about making my own that could be almost as good at a fraction of the price.
The Guts: Reflectix

I went back to a tried and true formula I used on the last window covers I made for my previous van: Reflectix and fabric. Reflectix gives these covers a bit of rigidity. Leaving the shiny side exposed reflects heat back into the van instead of allowing it to escape out the windows. They’re not strong enough to stand up on their own, but with the sides secured to the surrounding metal with magnets, they go flat against the window.
I had some leftover Reflectix, so my cost for this particular project was nothing. You can buy a two-foot wide, ten-foot long roll of it for about $20. I measured the general window dimensions and cut a piece of Reflectix to the overall size of the window. Then I placed it inside the window opening, from the rear, and cut around the edges with a utility knife. This gave me a piece of Reflectix the same size and shape as the window itself — at least, the part of the glass exposed to the inside of the van, which is all we really care about.
Note: Although I have absolutely no need for them, my van has rear window defoggers. If you have them, do NOT use this method to cut the side edges of your Reflectix! The blade will end up cutting the heating elements. They won’t get power, and they won’t work anymore. I cut the top and bottom edges with the knife, then used scissors to connect the side cuts. Obviously, this doesn’t apply to the other windows, or even the back if your van doesn’t have defoggers.
Note the Second: The back windows are different sizes! The left door is slightly wider than the right, and therefore the left window is, too. I originally cut a piece for the right window, then used it as a template for the other side only to find it was two inches too narrow. This shortcut doesn’t work on the Transit, even though the windows look the same size. Unfortunately, this means you can’t simply flip over the covers and use them shiny side out like I could in my E250 with symmetrical back windows.
The Cover: Cheap Black Fabric
The other piece of this puzzle is plain black fabric. You can pick this up at Walmart. My friend was already going to a fabric store, and she picked me up four yards of basic cotton fabric for $12.
Place your fabric flat on a table, then put each piece of Reflectix down on top of it. Make sure the side facing down, into the fabric, is the side facing the outside of the van. (Ask me how I know to check this.) I left about three inches of extra fabric on all sides of the Reflectix, then cut it to size. Precise measurements aren’t necessary. Then I folded each edge of the fabric back onto itself, only overlapping the Reflectix a little bit. You can sew this if you’re so inclined, but seeing as how I forgot everything I learned in my middle school home economics class, I simply stapled the fabric to the Reflectix.
The Stick: Magnets

There are multiple reasons why the fabric overhangs the Reflectix. One is so that it will cover any gaps between the window and the frame if you didn’t cut the Reflectix perfectly. But the main reason is so that you can use magnets to stick the cover to the metal surrounding the window to hold it in securely. Again, I already had these, but you can get a 16-pack on Amazon for $23.

I could’ve neatened up the corners of the fabric so they were tucked neatly. But I’m glad I didn’t because this becomes an excellent place to put the magnets. Then I just put one or two magnets along the long edges to seal up the gaps, and it’s done.

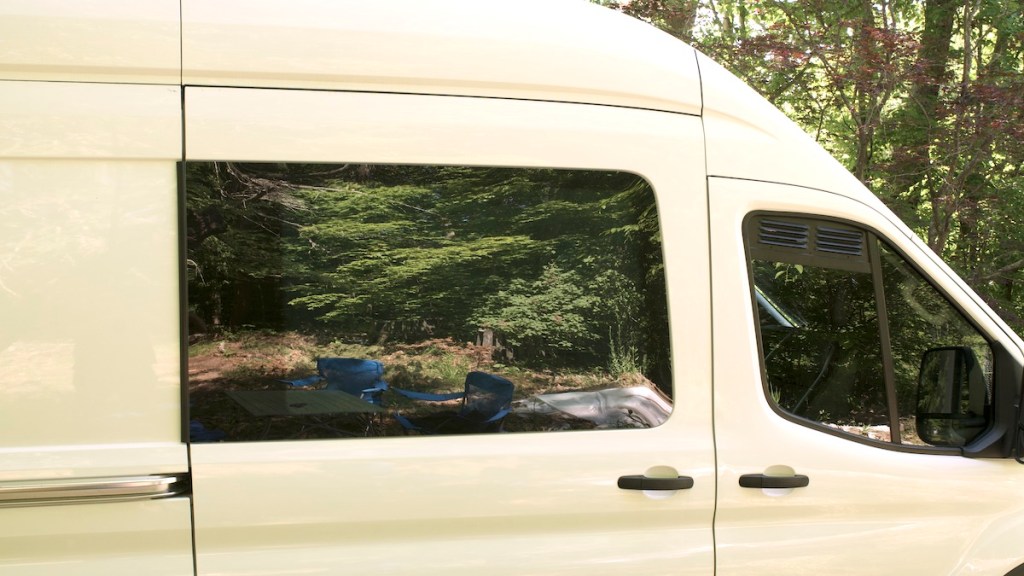
The covers work great. Here’s the side window against the white background of the van. You can’t see anything through it. Without the reflection, it looks like a dark-tinted window. The magnets are strong enough, and the cover lightweight enough, to stay on when opening and closing the door, even with a bit of force. I still plan to take it down when I’m driving, though, for the extra visibility out the side. And I still have my curtains to use when I just want some quick privacy and don’t need the tight fit and insulation.
If I’d had to buy everything, these covers would’ve cost me $55, including the Reflectix, the fabric, and the magnets. Even that beats $440 for the professionally made ones, and I got an even better deal because I already had everything but the fabric, which was the cheapest part. Sure, mine aren’t nearly as nice or well-made. They don’t have features like being able to fold part of them open while leaving them in place to let a little light in. But considering the $385 I saved, I’m fine with that.
