

One of the most common questions we get is how we bring my motorcycle with us on our travels. Here’s how we do it.
What I Use

First, we installed a Curt 14055 trailer hitch (Amazon link) on the back of the van. The hitch easily attaches to the frame with six bolts and no drilling. Then the carrier slides into the receiver like any other attachment. It includes what they call an “anti-tilt bracket,” which fits around the sleeve that slides into the receiver, then bolts down tightly to prevent the carrier from rattling or shifting around the way a regular tow bar would.
Black Widow graciously supplied us with their MCC-500 motorcycle carrier. This slips into the trailer hitch receiver and holds the bike during transport. It bolts together and is very easy to assemble. It also includes a ramp for loading and unloading your bike. It attaches to either end of the carrier, so I typically load it from one side and unload from the other, which means the bike never has to go backwards.
An important consideration for transporting a motorcycle this way is weight ratings. Look up the wet weight for your bike. The dry weight is the bike all by itself, without fluids, as delivered from the factory. What matters to us is the wet weight, which includes all of your fluids. My Kawasaki KLR650 weighs 337 lbs. dry, but 416 lbs. wet. With a weight rating of 500 lbs., this carrier can handle the KLR with capacity to spare.
Similarly, make sure your trailer hitch tongue weight can handle it. That’s the weight that your hitch can physically carry all by itself. You may be able to tow 5,000 lbs., but if the hitch has only a 500 lb. tongue weight, the bike plus the carrier itself (which weighs 57 lbs.) might be more than you can handle. The Curt 14055 hitch I chose has a tongue weight rating of 1,000 pounds, which again is more than enough for my purposes.

You may notice from this picture that when I test fit the bike immediately after assembling the carrier, my van’s tail lights and rear license plate are completely blocked by the bike. This may not be the case with your particular tow vehicle. The Chevy Express and GMC Savana have their tail lights high on the pillar, easily visible with a bike loaded. My Ford E-250’s were blocked, though. I installed a pair of surface-mount trailer lights (not these but similar) to either side of the rail, then wired them into a standard trailer light wiring harness. This plugs straight into the van, and now I have visible tail lights even with the bike loaded up.
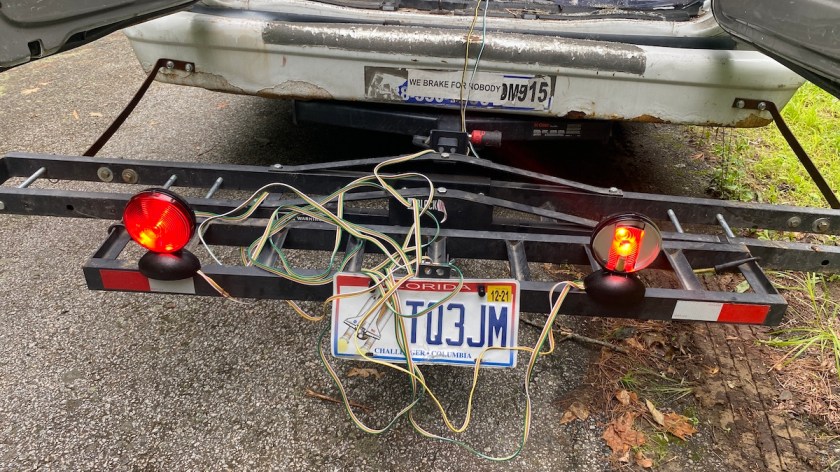
(Update, July 28, 2021: After repeated scrapes on the ground, one of these lights broke off, and the other wasn’t far behind. So I replaced them with a set of generic magnetic trailer lights that I stick to the carrier. I had to upgrade the bulbs to LED to make them work properly, and I painted the inside of the housing chrome to make them bright enough, but now they work and are visible.)
For the license plate, I modified a standard bracket and bolted it to the middle of the carrier, just below the rear tie-down points. I used a pair of license plate mounting bolts with built-in LEDs to double as lights for the relocated plate, wired in with tail lights. Numerous cops have passed me while running this setup, and not one has had any problem with it.
The final modification was quite simple, a couple of brackets between either end of the carrier and the bumper. As designed, the carrier allowed for a bit of rotation around the single point of attachment as we go over bumps and such. Our changes prevent much of that rotation and make me feel a little bit better, especially during loading and unloading.
How It Works

After driving from New Hampshire to Indiana, back to New Hampshire, and then to Florida, we’ve thoroughly tested this carrier over more miles than I ever expected to when I got it, before deciding to go full-time van life. How has it been working out for us?
Overall, great! At the time I’m writing this, we’ve done more than 4,000 miles with the bike on the back. Not once has the bike come loose or had any problems staying right where it’s supposed to be. This includes a couple of thousand miles across the terrible roads of New England, New York, and New Jersey. I still flinch when I go over a big bump at highway speed, but that doesn’t happen so much when you get far enough south for the ground to never freeze and cause such bumps. It does exactly what it’s supposed to do, exactly how it’s supposed to do it, even with a somewhat heavy KLR650 on the back. I’m pretty sure all of the weight considerations and calculations I made factor into that.

That said, a couple of criticisms remain. The carrier comes with a 45.5-inch ramp for loading and unloading. It doesn’t physically attach to the carrier in any way. The ramp actually fell off partway through loading my bike for the first time, causing me to drop it. Fortunately, it’s a KLR, so it wasn’t too badly hurt, but most other bikes would’ve been damaged by that drop from higher than the ground. From that point on, I’ve used one of my ratchet straps to hold the ramp onto the main part of the carrier to make sure that won’t happen again. When stowed, the ramp still flops around a bit. It’s not going to fall off the carrier, but I’ve used a pair of small bungee cords to further restrain its movement.
One thing you really have to keep in mind is how far the carrier sticks out from the back of your vehicle. In our case, the extended rear of the van already sticks out past the back wheels a bit, and the bike stretches beyond that. This leaves us with an absolutely terrible takeoff angle, which is how steep of an uphill transition we can take without scraping the carrier on the ground. It doesn’t take much for us to scrape. I’ve even had to take some parking lot entrances and exits at an angle so we won’t scrape. A stiffer rear suspension would help with that. Our 3/4 ton van is handling the weight fine, but either air bags or swapping in the suspension from a one-ton van would help give us a little more height.
These are relatively minor complaints. The height and poor takeoff angle aren’t even the fault of the carrier itself. The only suggestion I’d make to Black Widow is a way to physically attach the ramp to the carrier besides gravity, which doesn’t always do the trick.
For My Next Trick…

I’d already bought a Sony XAV-AX1000 head unit to get Apple CarPlay capability. I also had a cheap no-name rear camera leftover from my previous van that I’d never installed. So I installed it on this van, not only to see behind me when I back up, but also to keep an eye on my motorcycle while I’m driving. I didn’t go with the standard view from the bumper, since the bike would block that. I mounted the camera up high, on the fiberglass part of the roof just below the third brake light. This way, I could get an angle that would look over the top of the bike, but also show me that the bike was still hanging on for the ride.
As a bonus, this particular head unit lets me turn on the rear camera anytime I want. It’s so handy that I haven’t even bothered to wire it to turn on automatically with the reverse lights, since much of the time I just use my mirrors (I used to drive box trucks, so I’m used to not seeing directly behind me). Mainly I use the camera when backing into a parking space, just to make sure I don’t back the bike into anything behind me.
This step isn’t necessary or required to carry a bike on the back of your van, but since I already had everything I needed to do it, I’ve found it extremely helpful.
