
Since Amazon seems to have lost the power inverter I ordered, I’ve moved on to the interior build. For now, this will be more of a “no-build build.” This will get me on the road faster. Daytime temperatures are back in the 90s regularly, making it too hot to work on the van much of the day even with insulation and ventilation. This method also allows me to move stuff around and figure out my layout as I go, rather than put in the time and work upfront to build a permanent interior that might not work out for me in the long term.
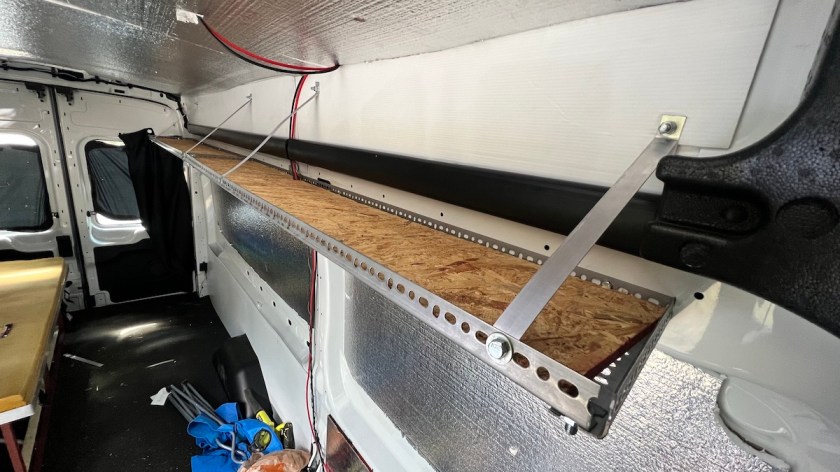
One of the few things bolted in is an upper shelf all along the driver’s side of the van. It turns out a local Ace Hardware sells angle iron for less than half the price of Home Depot, making the same construction method I used in the previous van financially feasible after all. Two six-foot sections, one-foot wide, are bolted to the wall, once again using the Transit’s built-in mounting points. This wasn’t strong enough on its own, but a little “redneck engineering” from my uncle led me to add some upper supports, bolted through existing holes in the sheet metal. Once again, I drilled no new holes to do this. The leftover scrap from narrowing the bed fits perfectly in one section, and a few trims on a couple of other scraps made the other side work, including a gap to allow wiring to pass through. With the addition of the supports, the shelf is solid and not going anywhere.

It was too hot and humid to build this afternoon, but that’s okay. The van’s air conditioning works great, and I hit not one but two Walmarts to build out the interior a bit. I got another curtain rod for the back of the van, rather than using a bunch of magnets to hold the curtains to the doors. It’s also easy to open them and let light in the back since I have no side windows. The clear plastic drawers will be for kitchen stuff. Being able to see inside them will help me find things without opening and rummaging through everything.
I also got three drawer units of three drawers each. I’d wanted two units with four drawers, but there was only one between the two Walmarts I visited, and it cost twice as much as the three-drawer version. I also figured out that all of the plastic parts are the same and just snap together. So I took apart one of the three-drawer units, added a drawer to each of the others to get what I wanted in the first place, have an extra drawer left over, and saved money in the process! My intention is to cut a piece of plywood to put on top of them and use it as a desk, but I still have to figure out the heights and dimensions I need to use it comfortably. It was too hot and humid to finish this today. This will probably make more sense once I finish this project and show you the result.
My folding table has seen better days, especially after suffering a few cuts and scrapes during the construction process, so I bought a new one to put behind the driver’s seat. This will cover up and protect the electrical stuff for now, as well as give me a similar place to put my refrigerator as I had in the old van.

I followed Yellow Wolf’s suggestion to use a pool noodle as a way to mount my USB faucet to my sink. A small L-bracket and some tape will finish the job. The hose that came with the faucet wasn’t long enough to reach the bottom of my water jug at this height, so I bought a 10-foot length of tubing with the right inner diameter to slide right onto the bottom of the faucet. Pool noodles have a hole through the middle that is perfect to run the tubing through. As soon as I move my fresh and grey water jugs into Smokey II, I have a fully functional sink.

I also added a small microwave oven. This was a luxury I skipped in my last van. I didn’t want the extra complexity of the powerful inverter I’d need to run a small microwave like this. Now, though, I have a bigger battery bank, more solar panels to charge it, and more confidence in my ability to wire a big inverter up properly. A microwave is a huge power draw, but only for a few minutes a day, and I think my current system can handle it once the inverter arrives. It was supposed to get here a few days ago, but Amazon seems to have lost it. I’ll get an inverter one way or another, but since I was at Walmart anyway, I picked up the smallest, least powerful (700-watt) microwave they had for just $50. Even if it draws a bit more power when it turns on, a 2,000-watt inverter should be able to handle it. I also picked up a power strip to leave plugged into the inverter to run Starlink and anything else I need to plug in. I need to trim the angle iron a little bit to make the oven fit better. That’s another job I’ll do when it isn’t 90º and 90,000% humidity outside.
Another reason I skipped the microwave in the last van was to challenge myself to do more actual cooking, and not just heat up lousy microwave dinners. This was partly successful, but I’ve also discovered that cooking for one is a real pain. I have to haul out the stove for every single meal. With such small portions, ingredients can go bad in the fridge or even the freezer before I get around to using them. It’s no extra work to cook four portions instead of one. I can eat one of them, then pack the rest away to reheat in the microwave in a day or two. It’ll be less work overall, and I’ll be more enthusiastic about cooking for real because I won’t be forced to do it all the time. It’ll also be handy to reheat leftover pizza or leftovers from going out to eat.
Anyway, the next step is to actually start moving things from the old van into the new one. That’s pretty exciting! At the same time, I’ll have a bit more wiring to do. My interior lights should be arriving today. As the layout comes together, I’m getting a better idea of where I want to put outlets, so I can start acquiring and installing those. The build isn’t done yet, but things are starting to snowball at this point, in the best possible way. There may be a light at the end of the tunnel.
